LOAD Tab
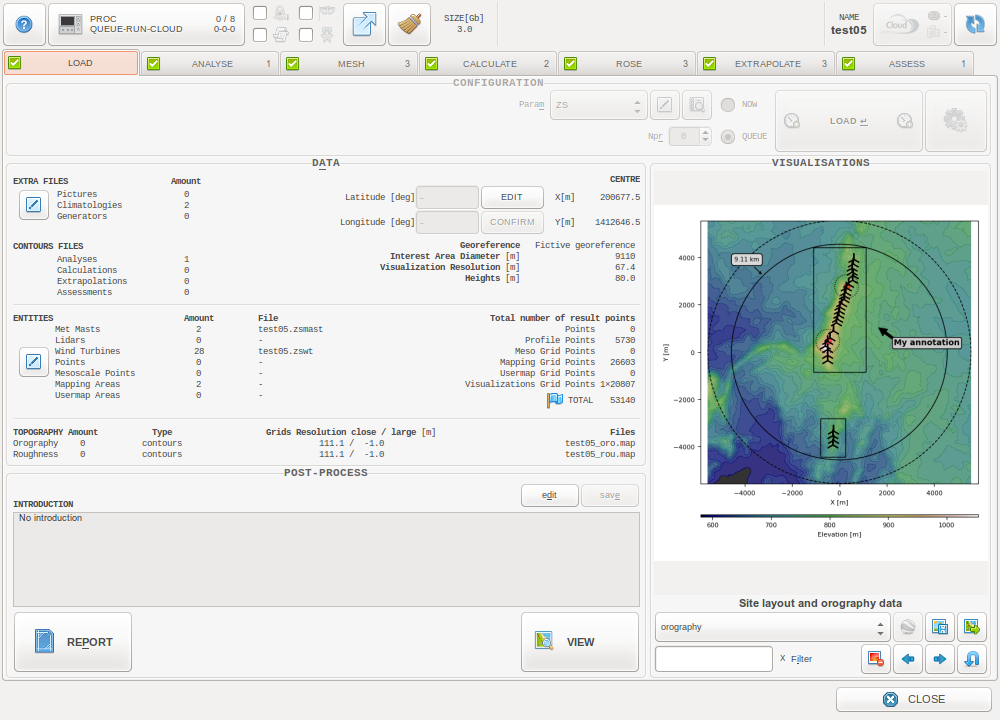
The LOAD Tab
The “Load process” deals with:
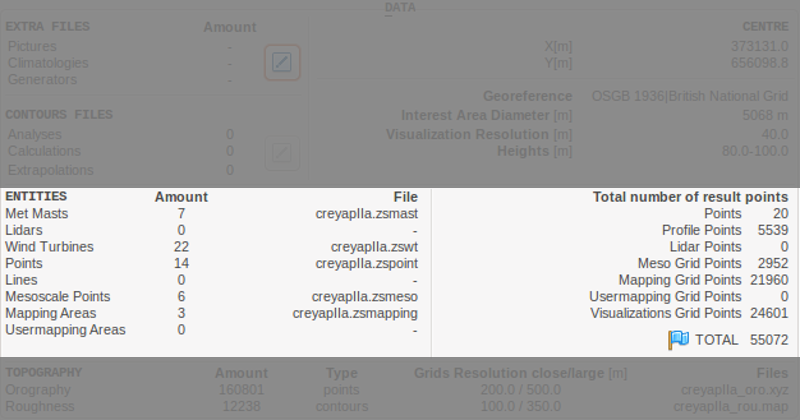
Data transfer
- All the input files defining the project are translated in in the project’s reference.
- All the topography data far from the project are removed during the transfer.
Topography data visualization grids
4 topography data visualization grids are generated (orography and roughness data, close and large views).
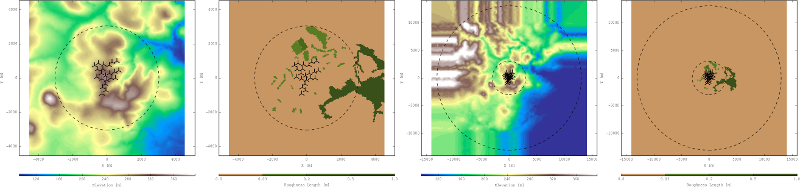
It remains possible to modify the resolution of these grids to produce bettter quality visualizations, from the visualization module.
Results visualization grids
- Circular visualization grids are generated to make possible visualizing the iso-height results over the project.
- Grid points corresponding to the defined Mapping Areas are generated.
Note
The process duration is proportional to: The visualization grids resolutions, the amount of orography data, and the interest area diameter.
Process options

|
Process priority: Select “NOW” to launch the process immediately, or “QUEUE” to queue it after already launched processes. |

|
Number of processors to be used: Nproc 0 will automatically consider maximum available resource (=Total CPUs - 1). |
Process parameters
The inputs defining the Load process are read from the selected set of parameters.
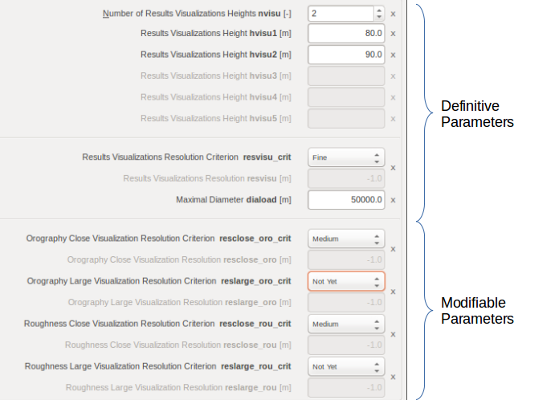
Topography Resolutions can be set by selecting “coarse”/”medium”/”fine”.
If “User defined” is chosen, user can set the values by inputting numbers in the box. “Not yet” will disable the generation of visualization gird to save time, but keep possible to launch the visualization generation later.
Visualizations
The LOAD Tab features Maps & Iso-Heights visualizations.
Modify the input files

It is possible to modify the input files after the project has already been loaded and processed, using the edit button located on the right of their respective frames.
Climatologies, contours, generators, pictures
These input files can be modified at all times.
Note
Considering the project modeling methodology, it starts being interesting to link a project with a climatology from Step 2 - Analysis.This is not mandatory and this issue has only to be adressed prior to the Step 6 - Extrapolation.
Results entities (Post-Extraction)
The results entities (cf “ENTITIES” frame) are hard-coded into the meshes and calculations so they cannot be modified easily. To do so, if some CFD calculations have already been performed it is needed to go through a process of CFD post-extraction.
The post-extraction process is meant to extract results at unanticipated locations in the domain, using an archived lighter version of the raw CFD results. In order to preserve the original project and its results, a new version of the project has to be created under a different name.
Note
- The existing meshes will be cleaned in the post-extracted project: To perform new CFD calculations, it is necessary to generate new meshes.
- It is not possible to perform post-extraction in a post-extracted project.
Technical notes
Keep control of your mapping area and visualization surface resolutions.
The more entities, the longer the processes… Not only for this step, but also for the next ones.
Keep descent the resolution and number of heights for the mapping areas (their resolutions will not affect the model resolution). It is possible to define several mapping areas (check out the Mappings documentation). The number of sub-entities per mapping can be accessed by reporting the mapping file before the project is loaded.
Huge process duration for the loading process?
This is often linked with the combination of…
- Huge number of sub-entities
- Huge number of orography data to process
- A too accurate orography data file will just lead to increase the processing time, and not necessarly the model accuracy.
To save time, start with coarse resolutions for topography visualizations, increase these once the project is loaded.